Reading Made Simple |
|
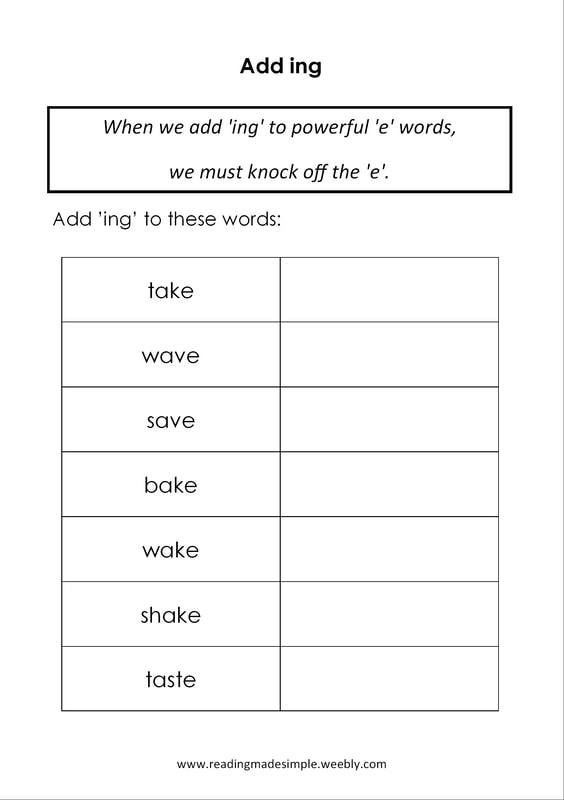
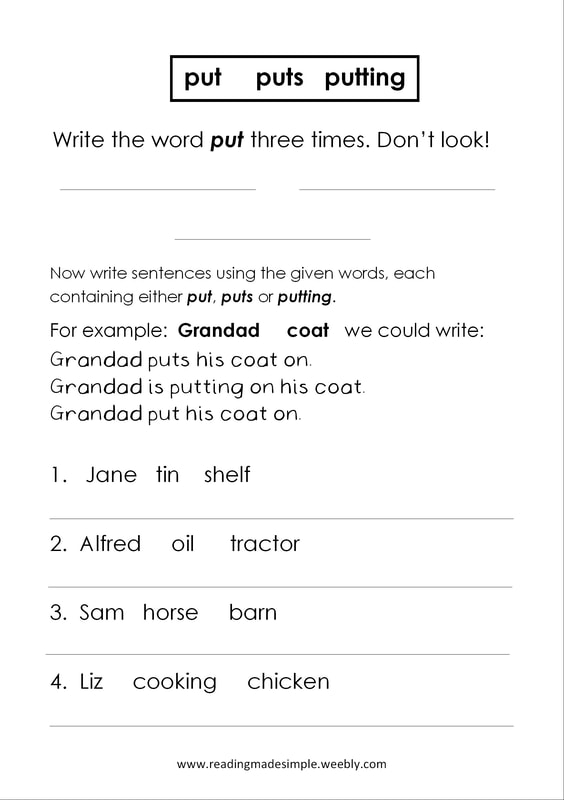
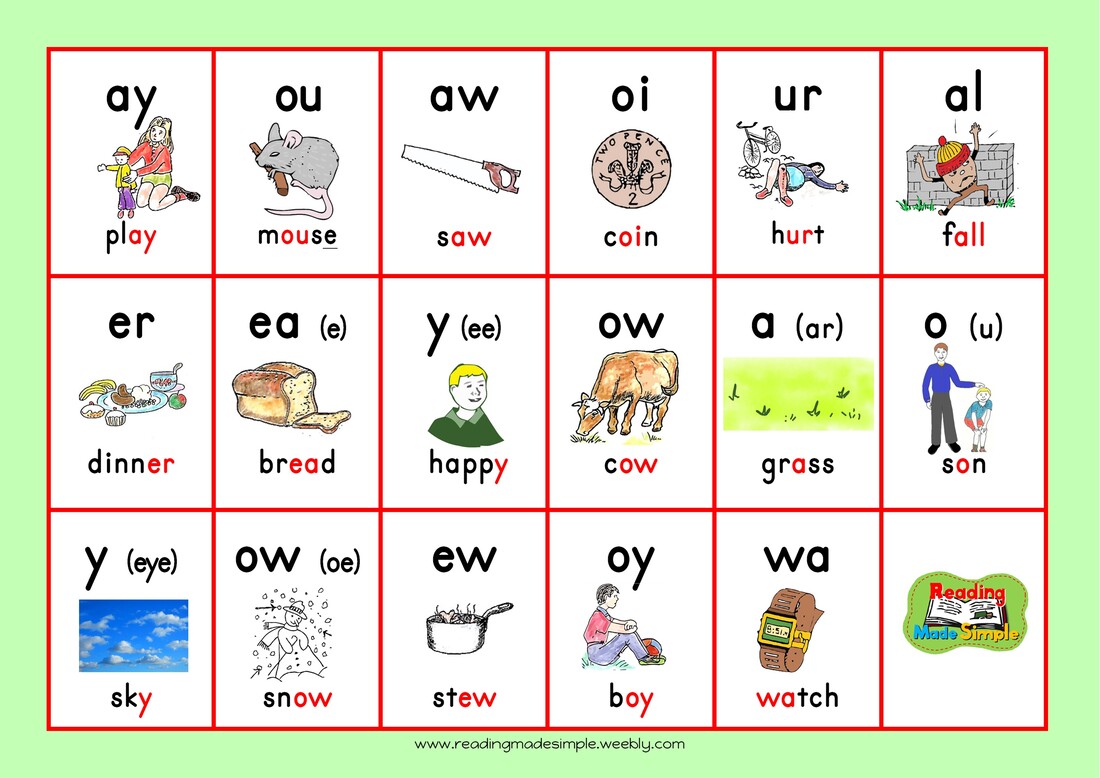
Here is a list of the resources available to support you in the teaching of Level 2 of Reading Made Simple, a 100% FREE phonic reading and writing programme. As for Level 1, we have a range of resources to support learning. Of course, we cannot cover for every eventuality. Thankfully the web is full of wonderful ideas to help children over certain difficulties. Therefore, if your child is still stuck with something after having been taught a lesson, be it Powerful 'e' (often called Silent 'e', Magic 'e' or Lazy-e) or when to use er/ir/ur, or whatever it is, then please feel free to browse for ideas to try with your child. You do not need to use any of these free resources. By just doing the lessons as outlined each week, the programme can still be successful. Word Family Lists A PDF file with the words for each phonic family taught in Level 2 listed with the new sound highlighted in red. Suitable for mid-week use and revision. If printing in colour is a problem, then print in black ad white and ask the child to mark the new sound letters with a red marked pen.  Click image to download Phonic WorkbooksFollowing on from Level 1, these workbooks give plenty of exercises in:
These phonic workbooks can be found on the individual lesson pages. Reading Intervention Decodable Reading BooksIf your child has come to Reading Made Simple, can decode to tooo great a degree to have to go right back to Level 1, but is guessing too much, then these books can help to refocus the pupil on all of the sounds in a words, rather than just a few. The books assume the that the child knows the basic sounds taught in Level 1, and gradually expands vocabulary and ability to sound out more complex words, as the child works through level 2 to consolidate his/her skills. Find out more here.   The dictation is a very important part of the weekly schedule. The dictation given each Friday should be for the sound-family learned the week before. Note: for Level 1 the correct dictation is given under each lesson. The child should be instructed to do his/her best handwriting, but the teacher must understand that it may not be as neat as for a handwriting lesson as the child will be focussing on the spelling and at this stage may not be able to do two things well at once. However, this should never be used as an excuse to accept less than the child's best. Rubbers should not be allowed as they encourage errors (rubbing out is fun and stops the child from thinking by interrupting the flow of thought). The child should be instructed to draw a neat, horizontal line through any errors. This allows the teacher an insight into the child's thinking and discourages thoughtless errors. Follow this procedure: 1. Provide the child with a pencil and a lined notebook. Make sure that the child is seated at a suitable height in relation to the table. Feet should touch a surface.
If the child makes a mistake, it should be neatly crossed through with one line. This will discourage a child from making mistakes. Rubbers teach a child to make mistakes. 2. Make sure the pupil is familiar with all the words in the passage, including any 'odd' (irregular) words. 3. Read the passage, to the pupil, right the way through to begin with. Pause clearly at the end of each sentence. Ask the child to narrate back to you what s/he has heard. Then tell the child you will read it again, a word/short phrase at a time, giving time for him/her to write before you give the next part. Repeat each part twice if necessary, but we want to encourage the child to hold the information in his/her memory. 4. Do not help with spellings or punctuation. Turn away if you think you will be tempted to point out a mistake! 4. Once the dictation is over, ask the student to read his/her work through, out loud, pointing to each word (with finger or pencil tip) to check for errors. Check for two things:
Help as necessary until the passage is correctly spelt and punctuated. 6. It is good if the pupil can draw a picture to go with the dictation, as this helps to establish the words on each list in the child's mind. To close, some pearly of wisdom from charlotte Mason regarding handwriting: "No work should be given to a child that he cannot execute perfectly, and then perfection should be required of him as a matter of course. For instance, he is set to do a copy of strokes, and is allowed to show a slateful of all sorts of slopes and all sorts of intervals; his moral sense is vitiated, his eye is injured. Set him six strokes to copy; let him, not bring a slateful, but six perfect strokes, at regular distances and at regular slopes. If he produces a faulty pair, get him to point out the fault, and persevere until he has produced his task; if he does not do it to-day, let him go on to-morrow and the next day, and when the six perfect strokes appear, let it be an occasion of triumph. So with the little tasks of of painting, drawing, or construction he sets himself - let everything he does be well done. An unsteady house of cards is a thing to be ashamed of. Closely connected with this habit of 'perfect work' is that of finishing whatever is taken in hand. The child should rarely be allowed to set his hand to a new undertaking until the last is finished." (pg 160) How to do the daily lesson warm up in Levels 1 and 2 The warm up should take 5 to 10 mins max every day: See below for more detailed instructions for each part.
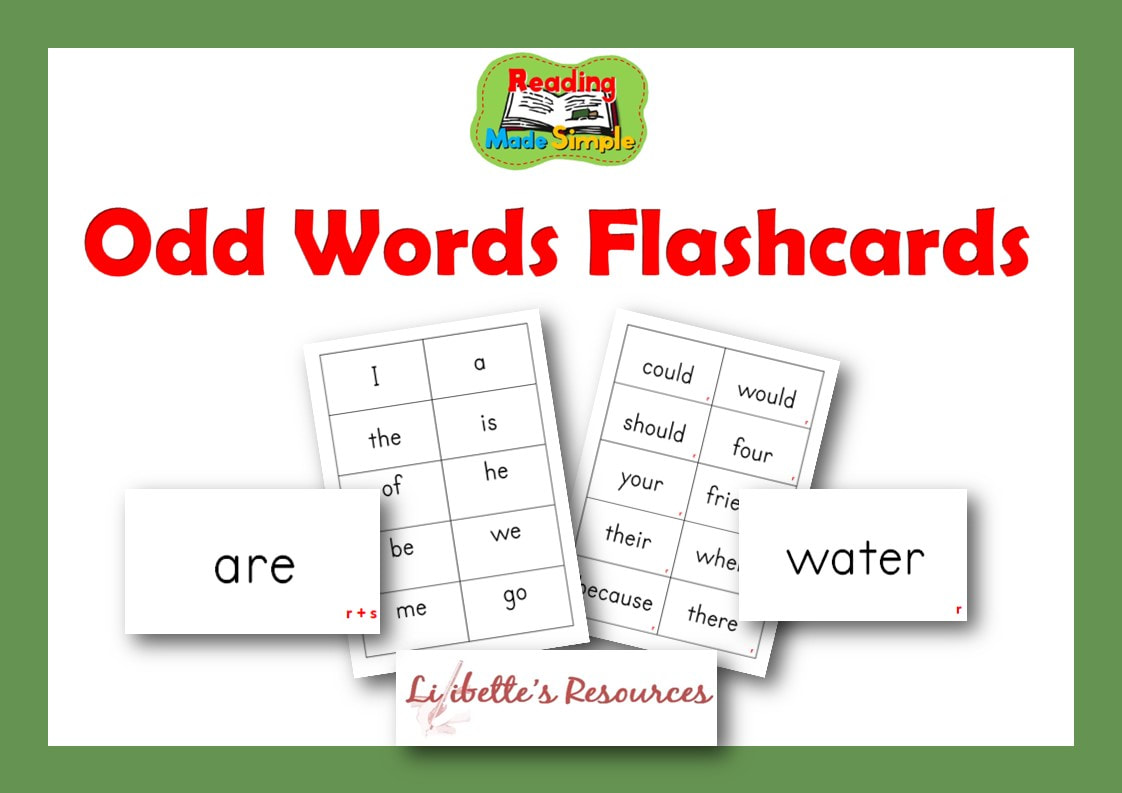
How to practice the sound-family/odd words flashcards:Put the flashcards in a pile. Take one flashcard at a time, ask the pupil to say the sound and put it on a new pile if it is correct.
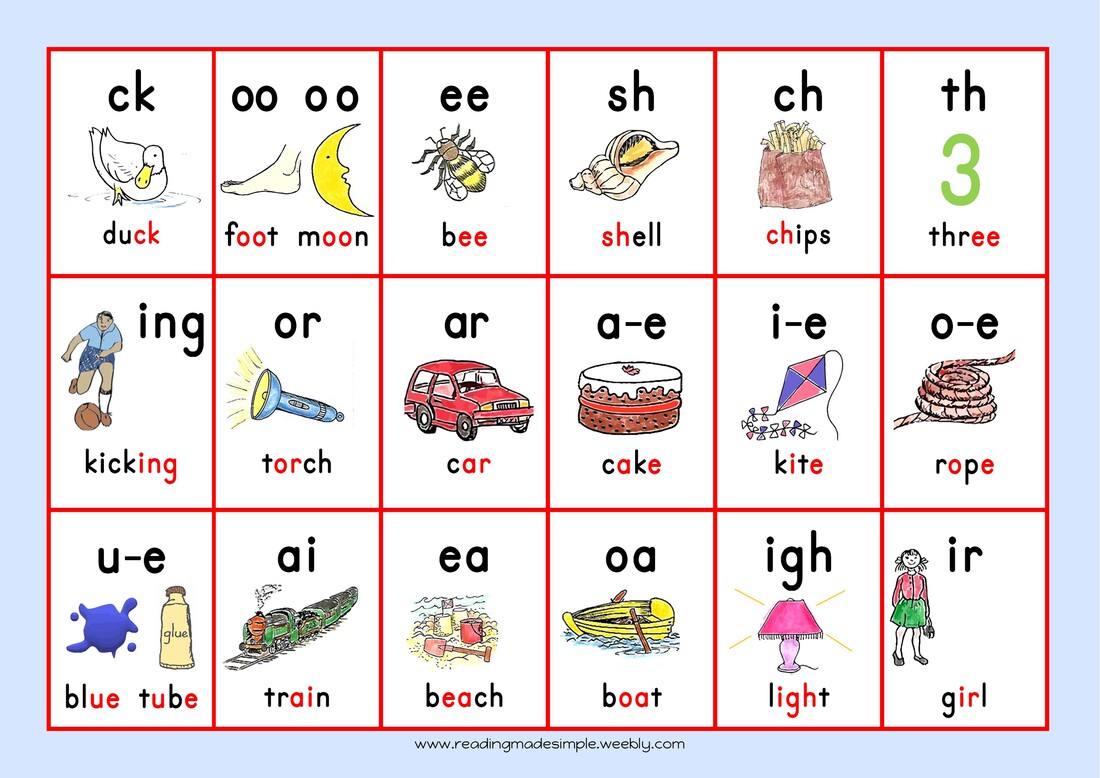
If it is said incorrectly, place it on a separate pile. When you have completed the flashcards through once, take the incorrect pile, and rework them making two piles as before. Continue until your pupil can recognise every sound correctly. Once again, we are aiming to have these groups of letters (which make one sound) stored in the pupil's long term memory so that no effort is needed to recall the appropriate sound when they are seen in words. Although it may seem boring, this repetition is vital to success. DO NOT MISS IT OUT. Do ensure that you know the sound that each group of letters stands for yourself before presenting the words to your pupil. If you are not able to use physical flashcards, then you can use our video flashcards. They are second best, but better than nothing. As Level 1 is so important and often the hardest for learners, we have a range of resources to support learning. Of course, we cannot cover every eventuality. Thankfully the web is full of wonderful ideas to help children over certain difficulties. Therefore, if your child is still stuck with something after having been taught a lesson, be it Powerful 'e' (often called Silent 'e', Magic 'e' or Lazy-e) or when to use er/ir/ur, or whatever it is, then please feel free to browse for ideas to try with your child. You do not need to use any of these free resources. You can make your own flashcards, for example. You may not like/need the reading books* or work books/worksheets or games, but by just doing the lessons as outlined each week, the programme can still be successful. * However your child will progress more easily and smoothly if you can use them as the key to any good reading programme is a structured reading scheme that matches the order in which sounds are introduced in the Phonic programme.. Phonic Word Family ListsThese are handy lists of words for each lesson. Print and display after the lesson for frequent review with your pupil.  Click to download Sounds ChartUse as a poster or laminate and make into a place mat. Children love to keep track of their progress as they move through the sounds!
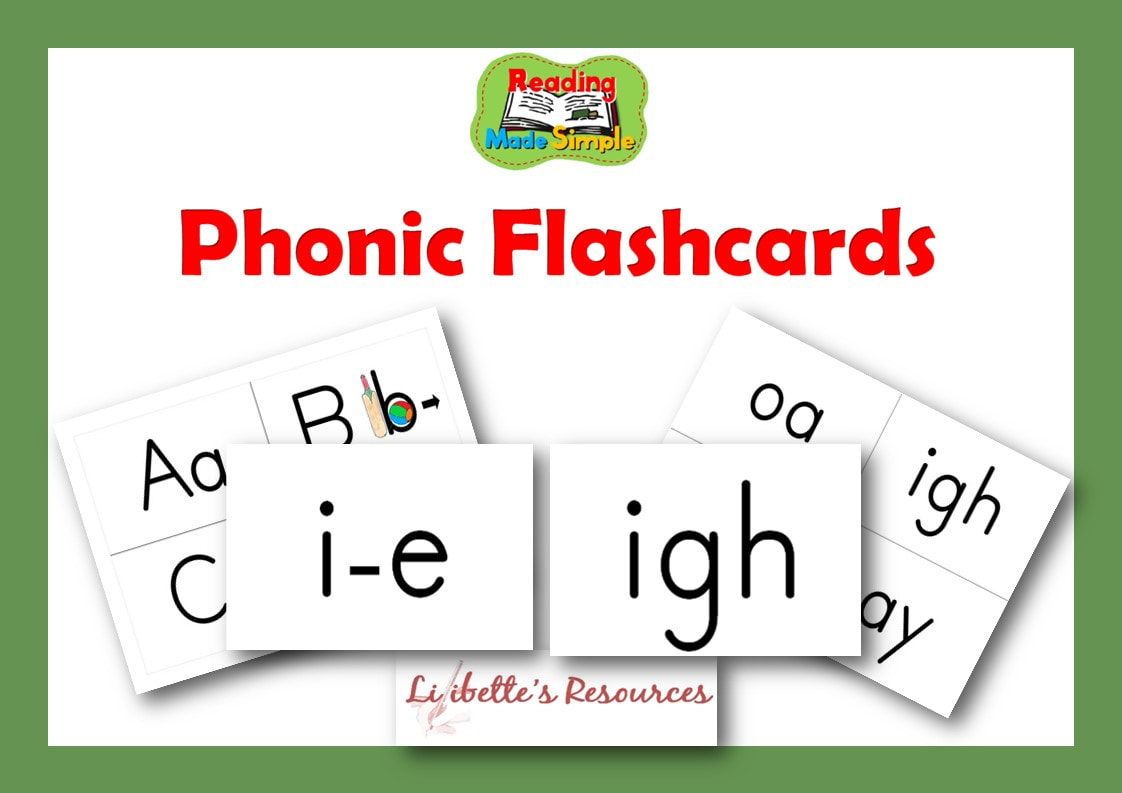
FlashcardsConvenient and easy to print and use, we provide phonic and odd words flashcards. Print on card as they will be used time and time again and must withstand frequent use. Laminate for durability.
Phonic Decodable Reading booksThese reading books are matched to the progression of the sounds introduced in Level 1. Starting with /ck/, the books only use words that can be sounded out using phonic sounds learnt so far. This means that:
As children move through Level 1, many will start to see patterns in words for themselves and read more widely, however we offer support for those that require it.  Phonic Workbooks The Level 1 phonic workbooks give extra practice spelling and reading words containing the new sound. They have been written particularly for the younger child, so some children may not need them. The workbooks give vital practice in:
|

  |   |
Phonic Spelling Programme Level 1
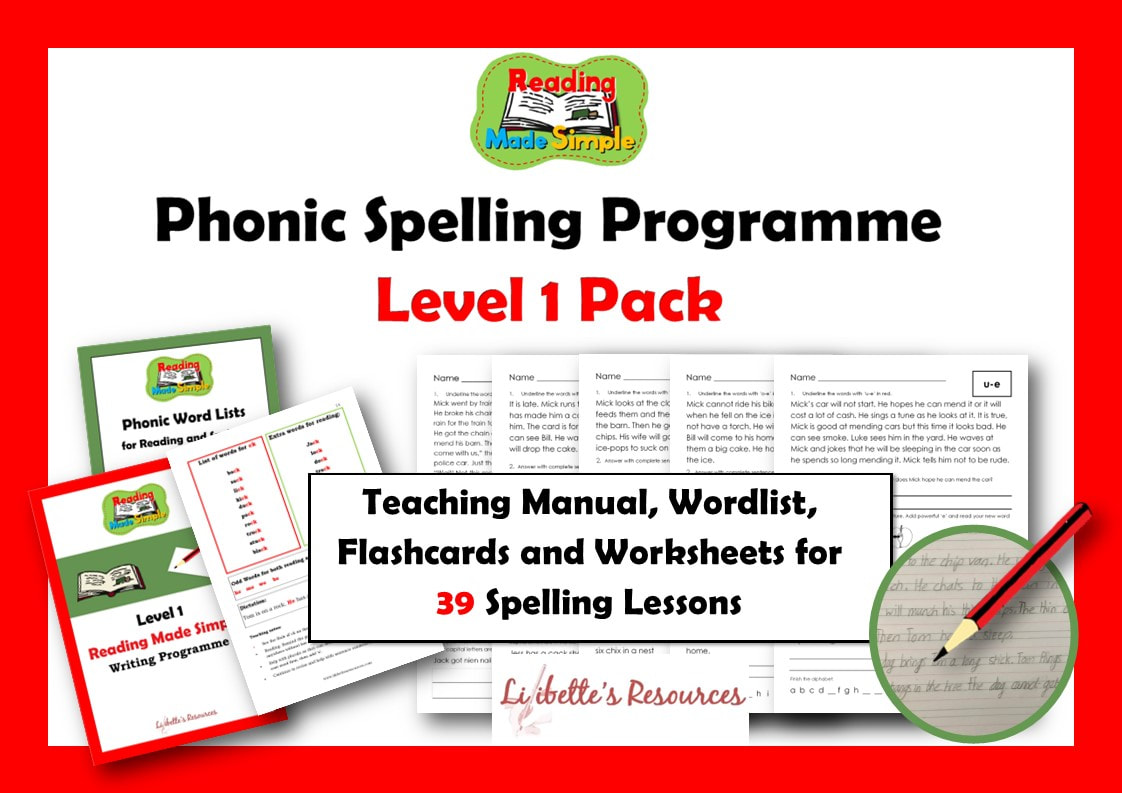
For the older child who is learning to read and write, or one who can already read, but needs help with spelling in a more structured way (including those suspected of being dyslexic) we have a set of worksheets that can be used to supplement the Level 1 programme.
The pack includes the Level 1 Teaching Guide, the Phonic Word Lists as well as graded 39 worksheets.
These are available for PDF download for £5.
The pack includes the Level 1 Teaching Guide, the Phonic Word Lists as well as graded 39 worksheets.
These are available for PDF download for £5.
Read all of this page before starting.
It is important that these instructions are closely followed.
Although this looks a lot, in practice it is very simple once you understand what is needed.
These are general instructions for all four Levels of Reading Made Simple.
General notes:
* Special needs pupils with severe difficulties may need to stay on a sound for longer, depending on how much teaching can be accomplished each week. But even so, keep moving forward as quickly as you can. Build in more review weeks if necessary.
Follow the simple Lesson Plan
See here for further instructions as to how to revise flashcards.
On Monday
Each sound should be studied for one week.
This looks a lot of information, but once you understand what is needed it will become simple.
Level 1 Resources
Level 2 Resources
Level 3 Resources
It is important that these instructions are closely followed.
Although this looks a lot, in practice it is very simple once you understand what is needed.
These are general instructions for all four Levels of Reading Made Simple.
General notes:
- Lessons should take place daily (Monday to Friday).
- At Levels 1 and 2, reading and spelling should be studied together* taking only one new sound per week. Trust this speed. It works!
- Daily flashcard drill of the previously taught sounds is essential to success. Please do not dismiss this as 'boring'. It is a tried and tested method that WORKS! This ensures that children have the opportunity to really get familiar with each sound and the words that contain it. This builds success. You will soon see how important this is as you see your child succeeding.
- At level 1, all children will study the words in the main red box in each level for both reading and spelling. These are the words that will be used in the dictations. Likewise Level 2 the Green box.
- Only if able should a child attempt words in the additional green box for reading (Yellow for Level 2)
- Levels 3 and 4: Reading lessons: You may move through the sounds as quickly as possible, ensuring that your child can sound out the words, on each list, accurately and easily. The child needs to have sounded out each word at least 4 times for them to be stored in the long-term memory for easy recall. Some children may benefit from spending a week on each sound for both reading and spelling.
- For all levels, follow the sounds as they are presented, as each one builds on the one before.
- Use a good handwriting programme* alongside Reading Made Simple *(Recommended but not the only one you can use. I receive no commission for advertising this handwriting programme.)
* Special needs pupils with severe difficulties may need to stay on a sound for longer, depending on how much teaching can be accomplished each week. But even so, keep moving forward as quickly as you can. Build in more review weeks if necessary.
Follow the simple Lesson Plan
- Every lesson should start with a 5-10 minute warm up:
- Start by practicing the short vowel sounds (vowels saying sound not name).
- Then revise the previously taught sound-family flashcards.
- Then practice the already introduced odd words.
- Thoroughly practice any weak odd words/sound-family flashcards that are identified as such.
See here for further instructions as to how to revise flashcards.
On Monday
Each sound should be studied for one week.
This looks a lot of information, but once you understand what is needed it will become simple.
- Introduce the new sound on a flashcard.
- Write each word in turn from the Main word box on a blackboard, sounding it out as you go. I prefer a blackboard as it encourages the teacher to model good handwriting to the child in a way that can never be achieved with a whiteboard and this modelling is vital. Emphasise the new sound as you sound out the word and repeatedly stress that we have two (or three in the case of igh) letters make one new sound. Make the letters of the new sound stand out in red, e.g.
- Draw the pupil’s attention to any underlined tricky parts indicated in the word lists.
- Model how to break up multi-syllable words as you sound them out. Each syllable must have a vowel (which will later included the letter ‘y’).
- Rub the words off the board.
- Children should be provided with a special, lined book in which to write the word family lists.
- Slowly dictate one word at a time, watching carefully and only proceeding to the next word when you see that the child has completed the word in hand.
- Once the list is completed, ask the child to sound out each word in turn to check that it has been spelled correctly, This is important. Give minimal help other than to direct the child to an error if s/he does not see it for him/herself.
Level 1 Resources
Level 2 Resources
Level 3 Resources
Tuesday - Thursday
- Do a warm -up as above.
- Read the new word family list EVERY DAY.
- Practice the new sound family using worksheets/games where helpful. These can be found on the Reading Made Simple website.
- Teach new odd words as listed in each lesson using LOOK, COVER, WRITE, CHECK.
- Make sure that all teaching points listed in the Teaching notes have been covered before the end of the week.
- Practice sounding out to read the extension words for Levels 1 in the green, 'Extra Words' boxes. Some or all of these words can be omitted if your child needs to focus on the main list of words for each level. They will be learned in the next level.
- Complete the workbook/worksheets where relevant (optional)
- Read the relevant reading book for the previous week’s sound (optional) if your child is learning to read and spell.
- Revise previous families as necessary based on your ongoing assessment.
- Practice anything that was found to be causing problems during the Friday dictation last.
How to read with a child
- Sit next to the child.
- The child can point for him/herself, but the adult should also run a pointer (I use a pen/pencil) along the top of the words (not underneath - for that is where the child’s finger will be).
- Should the child misread a word, the child should be trained to stop when your pointer stops.
- Use your pointer to indicate the error; may be point to the sound that has been missed out of a consonant blend, or maybe the child has not spotted the sound , and ask the child to have another look at the word. ask questions if need be.
Friday
Dictation
See further instructions here.
Dictation
See further instructions here.
- Provide the child with a special wide-lined book/handwriting book, with space for a picture, in which to write their dictations and a sharp pencil.
- Best handwriting should be encouraged for this activity, however the teacher should be aware that much of a child’s concentration will, of necessity, be on the spelling, so handwriting may not be quite as it could be for a handwriting lesson.
- Dictate the sentences for the sound family taught the previous week. Read the passage slowly, phrase by phrase, repeating as much as needed, giving time for the child to write. This means that for the first lesson in each level there will be no dictation, so give practice ones.
- Once you have dictated the passage, read the passage through again while the child follows in his/her book. The child should check his/her work for errors. It is a good idea to do this twice, asking the child to check first for spelling errors and then for capital letters and full stops.
- As far as is possible the child should find all errors him/herself, even if this means you directing him her to the spot where the error is found, or the word, and asking him/her to sound it out. The child’s work should be perfect before the exercise is completed.
- Ask the child to draw a picture to illustrate the dictation. Pictures, for as long as you can encourage children to draw them, help children to remember the words on each list and group them together in a memorable way. As ability increases, they will tire of them, so they can naturally stop.
- This is useful time to make a brief check of children’s handwriting. If you see a letter incorrectly formed, briefly demonstrate the formation to the child and have him/her practise writing 5 good letters.
Teacher assessment of a dictation:
· Any sight words incorrectly spelt must be practiced before the next dictation.
· Any words incorrectly spelled should be noted and appropriate revision made of any weak sounds.
· If a child is still struggling with punctuation towards the middle of Level1, provide extra activities for practice and make it a real focus to help the child to get it correct. Some do just need much more reminding than others, even if they know how to do it. For these I offer some small incentive.
You can print these instructions by clicking on the picture below.
The weekly lesson schedule reviewed
Every day revise sound flashcards and previously taught odd words
Keep this short but focused.
Keep this short but focused.
|
On Monday teach the new sound family using the words in the red box plus any new odd words for reading/spelling or both. |
On Tuesday, Wednesday and Thursday revise the new sound family and new odd words. Extend learning where possible by attempting to read words in the green box. |
On Friday do the dictation for the week before's sound. |
